Unlock the Artistry of Red One Stroke Flower Nail Art with Acrylic Paint
There's an undeniable allure to red nail art. From vibrant cherry to deep crimson, red nails exude confidence, passion, and timeless elegance. But what if you could elevate this classic look with intricate, hand-painted floral designs that seem to bloom right on your fingertips? Enter the world of one stroke flower nail art using acrylic paint – a technique that transforms simple strokes into breathtaking botanical masterpieces. This comprehensive guide will walk you through mastering this captivating method, focusing on the fiery beauty of red flowers, ensuring your nails become a canvas for stunning artistry.
Many aspiring nail artists, just like those discovering endless inspiration on Pinterest for "Red nail art designs" and "Red nailart nails," often feel intimidated by complex patterns. However, the one stroke technique, particularly with acrylics, offers a surprisingly accessible path to creating professional-looking designs. It's about understanding the medium and the movement, allowing colors to blend seamlessly as you paint, resulting in dimensional flowers with minimal effort once you get the hang of it.
The Magic Behind One Stroke: Why Acrylic Paint Reigns Supreme
The "one stroke" technique, as its name suggests, involves creating an entire element – a petal, a leaf – with a single, continuous movement of the brush. The secret to its distinctive blended, dimensional look lies in loading multiple colors onto the brush simultaneously. When applied, these colors softly merge, creating a natural gradient that gives depth and realism to your design.
Crucially, this beautiful effect is best achieved with acrylic paint, not traditional nail polish. The core reason? Consistency. Nail polish is typically much thinner; if you were to load multiple colors onto a brush, they would quickly blend into a single, muddy hue before you even touched your nail. Acrylic paint, on the other hand, possesses a slightly thicker, more viscous consistency. This allows the distinct colors loaded onto your brush to remain separate enough to create a clean separation while still blending beautifully at their edges. The result is a vibrant, multi-tonal petal that would be incredibly difficult to replicate with conventional polish.
Another fantastic advantage of acrylic paint for nail art is its affordability and accessibility. You don't need expensive, specialized "nail art acrylics." High-quality craft acrylics, often available for a mere pittance at art supply stores or even discount retailers, work perfectly. They dry relatively quickly, are water-soluble (making cleanup a breeze), and offer a vast spectrum of colors, making them an ideal medium for experimentation. This cost-effectiveness makes learning and practicing the one stroke technique a highly approachable and rewarding endeavor for any DIY Red Nail Art enthusiast.
Essential Tools & Techniques for Red One Stroke Masterpieces
To embark on your red one stroke flower journey, gathering the right tools is paramount. While the technique itself is about skill, having the proper implements will make the learning curve smoother and the results more stunning.
- Acrylic Paints: Focus on shades of red (a vibrant true red, a deep crimson, a lighter rose), white (essential for highlights and blending), and green (for stems and leaves). Black or a dark brown can also be useful for delicate outlines or flower centers.
- Flat or Angled Brush: This is the workhorse of one stroke. A synthetic, flat brush with a sharp edge, typically ranging from size 2 to 4, is ideal. Angled brushes also work well, particularly for creating curved petals and leaves.
- Detailing Brush/Striper: A fine-tipped brush with long bristles (a striper) is perfect for drawing delicate lines like stems, tendrils, and intricate flower centers. A shorter, very fine detail brush can also be used for small accents.
- Palette: A non-porous surface like a ceramic tile, a plastic lid, or even a piece of foil works as a palette for loading your brush.
- Water & Paper Towels: Essential for cleaning your brushes and thinning acrylic paint if it becomes too thick.
- Base Coat & Top Coat: A good base coat protects your natural nails, and a high-quality top coat seals your finished design, adds shine, and ensures longevity.
- Nail Buffer & Files: For proper nail preparation.
Mastering Brush Loading & Basic Strokes:
The foundation of one stroke is correctly loading your brush. For a two-color blend (like red and white for a petal), dip one corner of your flat brush into your chosen red paint and the opposite corner into white. Then, gently drag the brush back and forth on your palette several times. This "wiggles" the colors together at the center of the brush, creating a smooth transition while keeping the outer edges distinct.
Once loaded, practice your basic strokes on paper or a practice tip. A common petal shape involves a gentle "C" or "S" curve. Start with light pressure, gradually press down as you curve, then lift your brush at the end. The pressure and angle of your brush dictate the width and flow of your petal. Remember, as the saying goes, oefening baart kunst (practice makes perfect). Don't be discouraged if your first attempts aren't flawless; consistency will come with repetition.
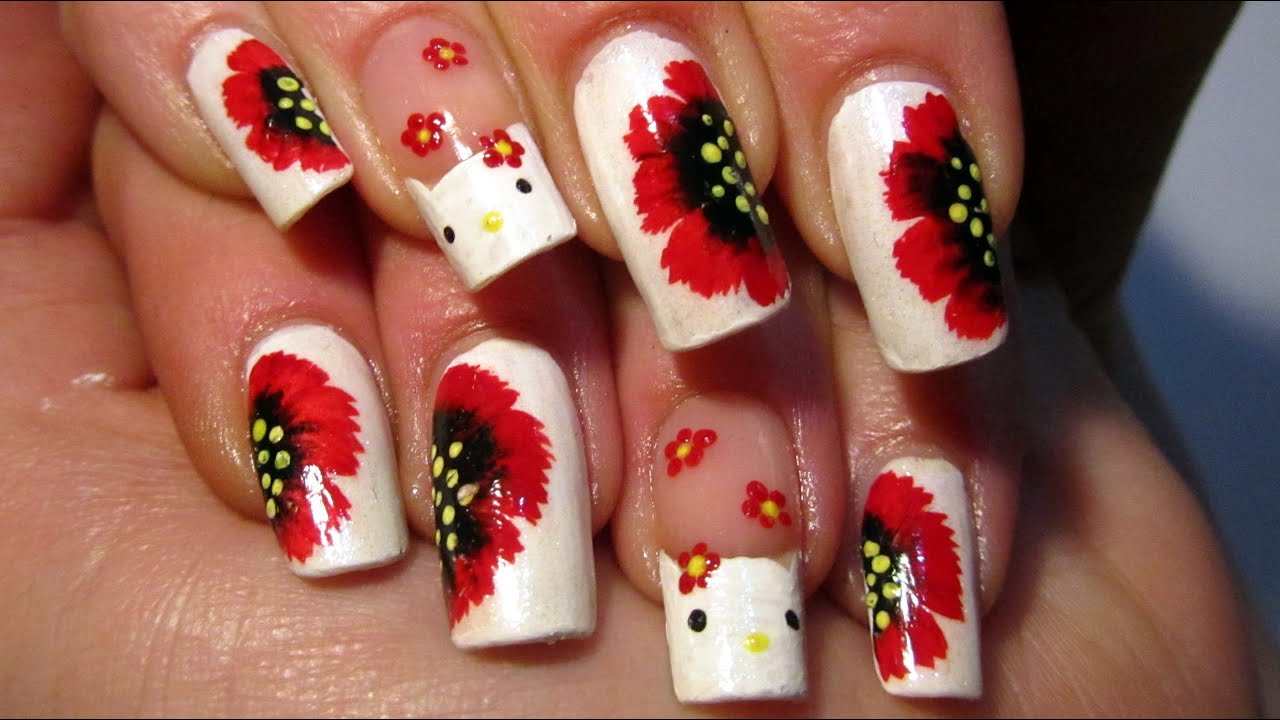
Creating Radiant Red One Stroke Flowers: A Step-by-Step Guide
Now that you have your tools and understand the basic principles, let's bring those red flowers to life:
- Prepare Your Nails: Start with clean, filed nails. Apply a base coat, then a neutral or contrasting base color (e.g., a nude, light pink, or even a sophisticated deep red) if desired. Ensure it's completely dry.
- Load Your Brush: For a classic red rose petal, load one corner of your flat brush with a vibrant red and the other with white or a lighter shade of red. Wiggle on your palette until the colors blend smoothly in the middle.
- Paint the First Petal: On your nail, place the brush down. Depending on your desired curve, typically with the lighter color on the outside. Gently press and drag, creating a "C" or "S" shape. Lift the brush at the end of the stroke.
- Build the Flower: Repeat step 3, slightly overlapping each new petal to create a circular bloom. You can make smaller petals in the center for a tighter bud effect. A typical flower might have 3-5 main petals.
- Add Greenery: Clean your flat brush or switch to a detailing brush. Load it with green paint (and a touch of white for dimension). Paint delicate leaves using similar one-stroke principles or simple pointed strokes around the flower.
- Detail the Center: Using your detailing brush or a dotting tool, add a small black or yellow dot to the center of your flower. You can add tiny lines radiating from the center for a more realistic look.
- Add Stems & Tendrils: With your striper and green paint, carefully draw thin stems leading from your flowers. You can also add delicate swirling tendrils for an elegant touch. (As seen in the reference, striper brushes are perfect for "halms" and "harts of the flower").
- Seal with Top Coat: Once all the acrylic paint is completely dry (it usually takes only a few minutes), apply a generous layer of clear top coat. This protects your artwork, gives it a professional shine, and smooths out any minor textures from the paint.
Remember to keep your acrylics moist by occasionally dipping your brush in water or spraying a fine mist on your palette. If the paint becomes too thick, a tiny drop of water can thin it slightly. Don't be afraid to experiment with different shades of red – a deep burgundy flower contrasted with a lighter red background can be incredibly striking.
Beyond the Bloom: Elevating Your Red Nail Art Designs
While red one stroke flowers are stunning on their own, integrating them into broader red nail art concepts can create truly unique and personalized looks. Think of your floral designs as a versatile element that can complement various styles and trends.
- Accent Nails: You don't need a full floral design on every nail. Choose one or two accent nails for your intricate red flowers, letting a solid red or a simple glitter polish shine on the others. This creates balance and draws attention to your artwork.
- Textural Pairings: Imagine delicate red one stroke roses blooming over a base of "crimson velvet-inspired nails." The contrast between the smooth, painted flower and a textured background adds a luxurious dimension.
- Metallic Accents: Combine the organic beauty of flowers with modern metallics. A single chrome nail, perhaps inspired by "Glamorous Red Lips Chrome Nail Art," could beautifully complement a set of nails featuring red floral designs. The reflective surface would add a sophisticated edge.
- Shape & Style: One stroke flowers look magnificent on various nail shapes, but they truly pop on longer canvases like "coffin nail" shapes, providing ample space for intricate details. Consider how your chosen nail shape influences the scale and placement of your flowers. If you're looking to explore a wider range of red nail art styles, from glamorous chrome to velvet textures and sophisticated coffin shapes, consider how these one-stroke flowers can be integrated.
- Thematic Designs: Red flowers are perfect for romantic occasions like Valentine's Day, but they are equally fitting for elegant everyday wear or special events. Change the background color or add subtle glitter to adapt the design to any theme.
For more foundational advice on mastering this technique and other DIY Red Nail Art ideas, including crucial practice tips, check out our dedicated guide that delves deeper into getting those initial strokes just right.
Conclusion: Embrace Your Inner Nail Artist
Mastering red one stroke flower nail art with acrylic paint is a journey of practice, patience, and creative discovery. It offers a unique way to express your personal style and add a touch of sophisticated beauty to your fingertips. Remember that the beauty of this technique lies in the seamless blend of colors achieved with acrylics and a practiced hand. Don't be discouraged by initial imperfections; every stroke brings you closer to perfecting your technique. So, grab your brushes, choose your favorite shades of red, and let your nails become a testament to your newfound artistry. With dedication, your stunning red nail art creations will surely turn heads and inspire admiration.